3 Watt Flounder Light Instructions
Our 3 watt underwater torches and charger are guaranteed for one year against manufacturing defects when used according to the following instructions.
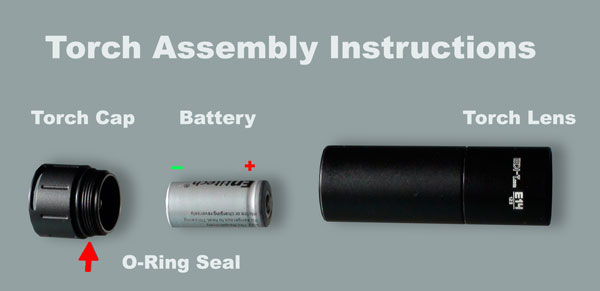
Changing the Batteries
Always take care to change the batteries in a clean area so the seal does not become contaminated with sand, grit or dust. Dirty or contaminated "O" Ring seals may cause leakage, which is not covered by our warranty.
NOTE: BATTERIES ARE INSERTED POSITIVE END FIRST AS SHOWN BELOW.
If sand, grit or dust gets onto the seal any surface contamination can usually be easily wiped away with a clean moist sponge and the cap left to dry before replacing the torch end cap.
If the lubricant on the seal is removed during cleaning, wipe the "O" Ring area with a sponge with a little silicone grease on it.
Do not use any other lubricant on any part of the torch unit. If the seal is badly contaminated or damaged by sand - do not remove the "O" Ring.
If it needs to be removed for cleaning or replacing, please take it to your local dive shop as they have the correct equipment, lubricants and experience to replace "O" Rings correctly.
NEVER use cloth or paper tissues to clean the "O" Ring as it will leave lint or fluff on the "O" ring and may cause leakage.
The switch at the back of the torch changes the settings. Press once to turn the torch on. Press the switch lightly and repeat to change between FULL POWER – 30% POWER and STROBE functions.
Avoid Cross Threading Or Over Tightening The End Cap
The end cap and switch unit has a self-aligning taper that allows the thread to engage in the torch body before the "O" Ring compresses.
It is highly unlikely that cross threading will occur. If the thread does catch or bind DO NOT FORCE it, simply turn the cap back and try again. Over tightening the cap is not necessary and will not improve the seal.
NOTE: BATTERIES ARE INSERTED POSITIVE END FIRST AS SHOWN BELOW.
Contact Us
Battery Charging Instructions
Insert the positive end of the battery into the charger so it is at the same end as the charging wire socket.
Screw on the charger end cap and check the green indicator light is ON. The battery is inserted correctly if the green light comes on without the charger being plugged in to a power supply.
If the light is not green the battery has been inserted incorrectly, change immediately to avoid damaging the charger or battery.
NOTE: BATTERIES ARE INSERTED POSITIVE END TOWARD CHARGING WIRE.
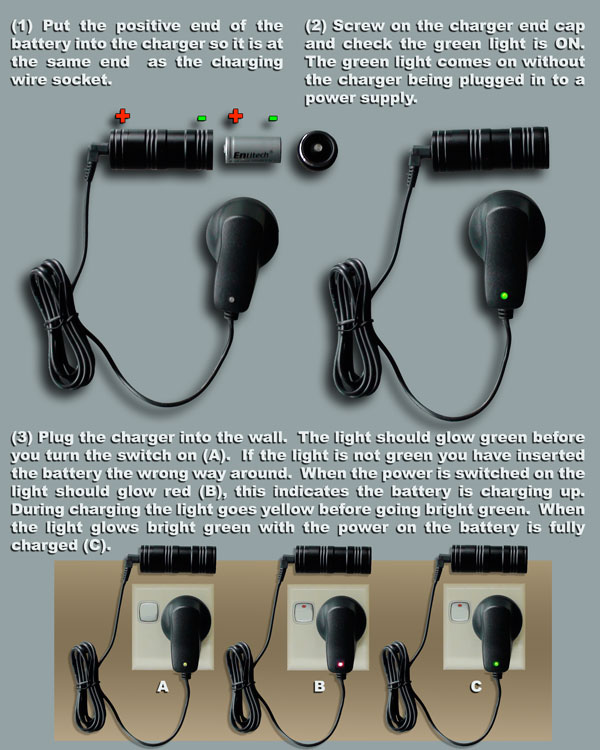
Plug the charger directly into the power supply. The indicator light should glow green before you turn on the power supply switch(A).
If the indicator light is not green you have inserted the battery incorrectly and it must be turned.
When the power supply is switched on the indicator light should glow red (B). This indicates the battery is correctly charging.
During charging the indicator light changes to yellow after an hour or two before turning a bright green. The battery is fully charged (C) when the indicator light glows bright green with the power supply switched on.
To ensure the batteries are fully charged leave them on the charger for at least six hours.
3 Watt Flounder Warranty
Warranty for Flounder Light.
The 3 Watt flounder light you have purchased is a purpose built underwater torch with a sealed lens and a tried and tested 10 metre (33ft) IP68 waterproof diving torch switch and cap unit with an "O" Ring seal. This combination will give years of watertight service if properly used.
Our 3 watt underwater torches and chargers are guaranteed for one year against manufacturing defects.
- Should your light not work for any reason, please contact us. If we agree that a fault in the light is a manufacturing defect a replacement light will be dispatched free of charge. Please note the customer is liable for all shipping costs involved on replacement parts.
NOTE: User contamination of the "O" Ring seal is NOT COVERED BY THIS WARRANTY!
- The switch and cap unit on the torch is the same as is used on diving torches and is perfectly sealed with an "O" Ring. The "O" ring seal must be kept clean to seat correctly and form a watertight seal. (Please see instructions above)
NOTE: Damage to batteries or charger due to charging batteries incorrectly is NOT COVERED BY THIS WARRANTY!
- The batteries must be charged with the correct polarity in the charger. Damage to the batteries or charger may result if the batteries are put in the wrong way round. (Please see instructions above)
Contact Us for more information about our flounder lights.
|
